Thursday, February 27, 2014

We are Mimi and Papa

Got an early morning call from our daughter Elaine yesterday morning, telling me I wouldn't be going to work that day.  She and husband Chris headed off to the hospital in the early morning after she'd been having contractions for several hours and then her water broke, but it was a long time before the baby was born. It ended up that Elaine felt comfortable just having Chris with her, so I waited for news at home with Grant.  Finally word came just after 7 pm that the baby had been born, healthy and well!  Yay!  The hospital maternity program includes something they call "kangaroo time", wherein the mother and father are alone with the baby for immediate bonding for 90 minutes, before baby is taken to be measured or weighed or allowed visitors.  There were three deliveries in a row last evening, so we didn't get a chance to see the new family until after 9 pm when they were moved finally to another room.

Presenting Cove Russell Gereau, born 6:51 pm on 2/26/14, 7 lbs 6 oz, 21 inches long.  It took our daughter three hours of pushing but she did a wonderful job.  So proud of the new mommy!

And the new daddy!  Chris was great at being there for his wife and also giving us updates throughout the day. 

I love this shot where he's got his finger in his mouth as I held him for the first time.

Proud and happy new Mimi and Papa to baby Cove. 

Sunday, February 23, 2014

Sewing Curtain Panels, Waiting for a Babe to Come

This twist on the Beatles* song came to me as I worked on the last job for the nursery.  Curtain panels don't require much sewing skill--there is more MATH, fabric ripping, ironing, and pinning than actual sewing.  Things were going fine until the stitching part, when I thought I might have a meltdown.  My sewing machine just had a spa day last week and this morning when I put foot to pedal, I expected nothing but quiet whirring of the newly oiled and tuned motor.  What I got was a terrible rattle in the bobbin case, despite a perfect stitch.  This caused an  immediate flurry of disassembly and trouble-shooting, including an Internet search.  Eventually, after some additional cleaning and reassembly, the rattle went away.  Whew!  

The curtain panels are of this black and white scribble-type cotton print.  The lining pieces are cut from cotton/poly flat sheets I bought at Walmart for $15 each. The nursery gets a lot of light from the huge window the room has, and although there are pleated window shades installed, the lining should help cut down some of the light.

I'm once again turning to this book for expert help.  It gives clear instructions and lots of variety in illustration on a wide range of clothing and home decorating construction.  Though it was published in 1976, most of the content is of the traditional dressmaking type instruction, sure to give a fine finish.  In the rear of the book are some "projects" one may make using the instructional guide.  

Check out this mod bedroom!  My favorite is the vinyl pillows.  Wouldn't those be cozy to curl up with on a hot day?  The light bulb shaped lamp kills me.  

I carried on with the first panel from start to finish, with the goal of having all the kinks worked out before making the second.  There were a few bumps along the way but I'm happy to say the first panel is complete, it is the specified size, and will hang flat!  Still waiting on that grandson--my daughter has been trying to "walk him out" by taking long trips around a nearby park.  Her due date was only Saturday, so he is not really late yet :)

*Did you get the Beatles song reference?  It was a line from I Am the Walrus, beginning with "Sitting on a Cornflake..."

Tuesday, February 18, 2014

Scrappy CW Play

On Saturday I felt like piecing and poked around the messy sewing room for something to play with.  While looking for something else, I found a few orts left from previous projects.  Handily next to that bin was another full of civil war prints.  An idea was born. 

I do think nine patches are some of the friendliest blocks around.

 So I decided to make some more.  This Judy Rothermel print is one I've hoarded for a couple of years. (CW prints do not go well with my ironing board cover!)

The three new nine patches joined two other leftovers from Julie's 9 patch swap from a few years ago.  The plain blocks just happened to be exactly the right size--they are leftovers from the 50 bowties quilt I made for my brother a few years ago, a Thimbleberries print in that warm golden tan I like so much. 

I had just a couple of 2.5" strips of this second Thimbleberries print that I sliced in half for a narrow border to float the center.  Another hoarded Judy Rothermel print for the outer border completed the small quilt top.


You can hardly tell where I pieced the outer border strips, can you?  While looking for something else, I found one more piece of the plain block Thimbleberries print, which is exactly the right size for a backing.  It was sure nice to have some piecing fun playing with orts!

Monday, February 17, 2014

A Quilt's Nursery Home

Our grandson is due in less than a week, and while his quilt doesn't have a label until his name is announced, I took the opportunity of the work holiday to get a few pics of the nursery he'll be spending so much time in.


Here's the quilt over the crib, adding some color to the neutral backdrop.

Some interesting and handcrafted items hang above the crib. 

The yarn-wrapped antlers were a handmade gift, and I stitched the fox embroidery.  They purchased the owl print and the vintage metal hanger was among items I got from a family friend.  The silver keys are echoed in the hanger.

I never showed the finished fox before, since I completed the stitching the morning of Elaine's baby shower but then took it back to put in a new hoop for display.  

In the crib are some soft toys, including a flat Teddy, and a Daddy Doll, made to order to look just like my son-in-law, with his beard and plaid.  I love the fox and bear pillows too.  So cute. 

Scully, the baby's future big brother, ready to stand guard.

Elaine didn't want to be in the picture but agreed to hold up the quilt.  Her legs made it in, tho!

The back is a single fabric, which was requested by the couple, and certainly easier for me, though I love a pieced back too!  

 In the corner Chris hung some spice racks they bought for next to nothing, to use as book racks.  Clever!

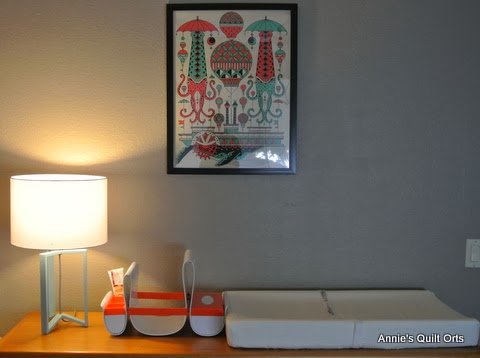
A wooden dresser, re-purposed from Elaine & Chris's bedroom, makes a good base for the changing pad and modern diaper holder.  The cool lamp was the result of much hunting for just the right look and color.  The colorful artwork above was another special print they found. Not a great shot of it, tho, sorry!


I brought one additional gift over to the nursery today.  This is a bib that belonged to my husband when he was a baby.  It is an obviously well-used and loved item, maybe hand embroidered for my mother-in-law by a friend or relative.  I found this cool shadowbox at Michael's, covered a piece of foamcore with the same linen I used for the fox embroidery, and simply pinned the bib to the foamcore.  Now, a few closeups:

Kitty and his ball of yarn.

 Ringtail raccoons and plaid bias binding. 

Architextures fabric backing, and quilting detail. 

Quilt texture from the front.  

 A baby is coming to this nursery: 
 
 
 Very soon!


Friday, February 14, 2014

Happy Valentine's Day!

My sweetie surprised me with early flowers and candy last night before I ran off to Bunco. He even volunteered to help me make my contribution to our Bunco dinner, guacamole and chips, by doing my least favorite part, scooping out all the avocados. I am lucky to have such a keeper of a husband!

And now, some elephant toes. 
Hope you all have a lovely day!

Monday, February 10, 2014

Design Wall Monday

It's actually off the wall, but I've completed the quilting on the geese quilt for Baby C. My daughter and I chose a plaid for the binding that I wanted to do as a bias binding. 


Last time I made bias binding two weeks ago I used the square method. I decided to do that again but needed help with calculations. I found this in my search: http://www.sew4home.com/tips-resources/sewing-tips-tricks/bias-binding-figuring-yardage-cutting-making-attaching
Sorry I can't shorten the link when I'm mobile blogging on the bus!  Anyway, the steps were clear and easy. 


At this point you trimmed the first strip' sends like the others and proceeded with joining the strips as usual.  My estimate was off, somehow, and I should have cut my square a bit bigger. So, add a little more to your binding measurements and round up, people!  
I'm happy to say the binding is all on at this point and except for closing the corners and attaching a label, the quilt is finished!  See more design walls on Judy's Patchwork Times. 

Saturday, February 8, 2014

A Quilting I Will Be

This cool and cloudy weather is good for quilting. I've cleaned and threaded, put in a new needle, and taken the first few stitches in the quilt for Baby C, who is nearly here, due two weeks from today!  My daughter will be working for one more week and then plans to go back part-time in April to her work as a hairstylist. 


I've been thinking about my own Grandma, how she came and stayed with us after each of her great-grandchildren were born, and how much I miss her. Getting a bit emotional about becoming a grandma myself and hoping I'll be a good one :). Very exciting times to look forward to. I'll be taking a few days off when our grandson arrives. Can't wait to meet him, and finally know his name, which his parents have kept a surprise all this time :). Now, back to stitching!

Tuesday, February 4, 2014

Moses Basket Redo

My expectant daughter and her husband were gifted with a gently used Moses basket and a rocker frame, but the pink and white basket liner didn't suit, so she asked me to make a new liner fit for my soon-to-be grandson.

Moses basket
As shown in an earlier post, I ended up making my own two-sided quilted fabric, as nothing was modern enough for the young couple.  After partially disassembling the existing liner to make a pattern, it was time to be brave and cut into the new fabric.  I used freezer paper to make the pattern, ironed it on the fabric, and cut out both panels at the same time with my rotary cutter and ruler. 


First order of business was to form the slits for the basket handles and attach a binding.  The Kona charcoal fabric I made all the bias binding from was a nice weight, but it needed some beefing up to stand up to the wear and tear from the basket handles. 


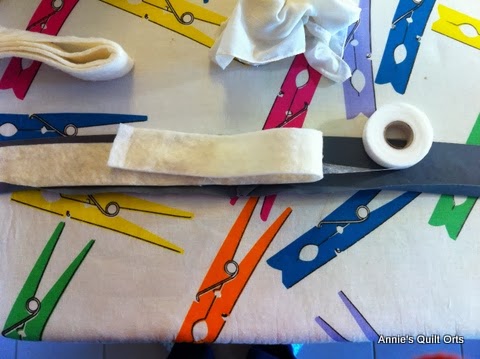
A little strip of leftover batting tucked in helped give it some body. 

Those slit ends were tricky but I took my time and they came out just fine. 

A decorative "chicken feet" stitch dressed up the finished edge.  Next came stitching the panels together and then applying similar binding to the top edge of the liner. 

This time I used some Stitch Witchery to adhere the batting strip on the bias binding.  While I was messing with all the binding parts, my sister Kathy was making a pattern to cover the cushion for the basket, the basket bottom, and also an extra set of pieces for a secondary cushion I wanted.  It is so nice to have an able assistant in the sewing room!


She had fun writing instructions to me on the freezer paper pieces :)


Dry fit of the liner and bottom piece.  I trimmed the point off the liner ends before adding the binding around the top.  The Kona charcoal bottom piece was then sewn in, with more dry fitting once the cushion cover was made and tested for snugness.  I ended up having to stitch another time around the bottom for a better fit, so as not to leave a gap between the cushion and the side of the basket. 

The bottom/panel seam was finished with a double fold binding.  No one will ever see it, since it will be  underneath the baby against the basket, but I did a good job!

The cushion was a very thin one, and I still need to get a piece of waterproof fabric to slip in the removable cover, so I felt my grandson was in need of additional comfort.  

So I made a "futon" from multiple layers of leftover batting and matching liner fabric, quilting it together as I did for the liner.  I did a simple satin stitch around the edges of the futon.

The original cover had elastic inside the top binding, but my fit was good and I didn't think it was needed.  My goal was to have the liner all finished this past weekend, and I'm glad to say I met that goal. 

QC inspection prior to delivery...

Mini's Paw of Approval sealed the project, and it was delivered to the nursery.  My daughter and her hubby liked it too. Yay!

Design Wall Monday--Catching Up

 Design Wall Monday --See more design walls on Judy's Small Quilts and Doll Quilts blog.  I disappeared for awhile, due to computer issu...