After making the binding and ironing it in half lengthwise, I accordion pleat it like so:
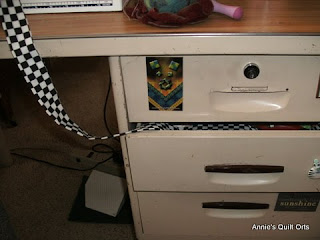
Then I put it into a drawer of my sewing desk (ignore the chipped paint and missing handle--this is mid century metal furniture I inherited from Grant, who had it since he was a kid) and close it almost all the way, leaving the tail ready to be pulled up to my machine.

I stitch the binding to the back of the quilt, following a line of basting sewn a scant 1/4" from the edge of the quilt top. I do this after I complete the machine quilting. The binding is sewn on in the traditional fashion, turning the corners and joining the tails diagonally.
After trimming away the excess batting and backing, I turn the binding to the front. The only thing I pin are the corners, as I come to them. I have long fingers so I can hold down a good section of the binding as I sew.

This is a three-step zig zag stitch and as you can see, it holds down the binding very securely and looks good.
For the machine quilting, I just did simple diagnoal "cross hatch" with a wavy line (no marking needed), outlined the border, and did a couple of wavy lines in the border. I called my quilt "Spotbot's Day Out", as there is a little robot dog on a leash held by one of the robots in the print. Now the hard part will be getting this in the mail!


8 comments:
I like that method!! Smart idea about the binding...last time I hung the binding around the iron accidentally and you can guess where the iron wound up!
Annie, that is completely cool! I love seeing this. Thanks for sharing and, ummm, giving me finger envy. Short fingers. :)
Enjoyed the visit here today!
Cute quilt. Love that checked binding.
You changed your blog layout. I like the spring look of your header.
It's a nice happy finish, Annie, great little guy quilt! Your new header is really nice, the colors show up better than your post of the quilt top originally, and it is lovely!
I am getting ready to bind a Quilt for Kids quilt. I was glad to see how you did it. I have never put the binding on the back. I like that you used a zig zag stitch on the binding, it should keep it nice and tight as they requested. Very cute quilt!
Great idea for putting binding on. That's always been a hand job for me but I'll try your way in a future quilt. Thank you.
I just made binding EXACTLY like that.
Post a Comment