Showing posts with label fabric. Show all posts

Sunday, May 21, 2023

Staycation Sewing Progress and Plans

Staycation continues! I have been able to spend a lot of time in the sewing room.  First priority was the next grandson's quilt.  I went with a simple design and used stash fabrics.  The sashing was cut from the bolt of Kona Bone I bought from JoAnn's some months ago. It is great to have on hand. 


The bottom looks wonky in this pic but really isn't in person. 


Final white border all around.  The pattern I found online used 1" sashing, which I thought was too narrow, so I cut mine at 1.5"--that also made the quilt longer and wider.  The prints were cut 8x16 and 8x8 square, the long vertical strip was also 8", so it is not a big quilt. My Husqvarna sewing machine needed a service, however, so my older model Husqvarna is standing in; it does not have the main features I love on the newer model, the automatic presser foot lifter and the thread cutter. I took the 40 minute drive to the repair shop, and was sorry to see the Quilty Pleasures shop in the same center  that I expected to also visit had closed. Instead, I wandered around a vintage resale shop that had lots of fun old stuff to admire. I came home with a Fiestaware platter to add to my dinnerware, in a dark rusty color I didn't have. 

A rare opportunity to make a baby girl quilt for a grand-niece had me pulling sweet prints and patterns from my precut scraps and fat quarter drawers. 


The pattern I am using is "Picnic", from Kim Brackett's book, Scrap Basktet Sensations; it's the cover quilt.  Most of the quilts use 2.5" strips and squares.  I used my GO cutter to cut the neutral strips and squares for a 6x6 block quilt; the blocks are 6" square finished. I'm assembly-line stitching them as quickly as possible, as baby is due in the next few weeks. 


I made one for myself about 10 years ago. See it Here.  

The trimmings I am sewing up into cute mini hourglass blocks. 


What a sweet doll quilt these would make--there are lots more made than these few that were on the ironing board:)

Monday, May 8, 2023

Bookshelf Quilt Nearly There

 Design Wall Monday--See more design walls on Judy's Small Quilts and Doll Quilts blog. 

The long journey of the Bookshelf Quilt for my niece Emma is getting pretty darn close to a end. I have finished quilting all the bookshelf items and am now working on the bottom drawers.    

The above photo was from 5/4/2023 when I had two sections of books to finish...


The above pic was taken 5/6/2023 when I completed stitching around all the shelf section books/items. That was a lot of arm exercise!


And here is Sunday's work; I made the hexagon pulls and quilted some details on the first drawer front, then appliqued the pulls with a narrow zig-zag.  Simple outlining to finish that drawer off.  After I finish the second drawer the same way, my plan is to trim the quilt and attach a black binding (still to be made!), before adding some stippling to the black background portions of the shelves.  I don't want them to get puffy when the quilt is washed.  There is a lot of lint on the quilt from the batting, so I will need to remove that with the lint roller before stippling the black. The outer border will need some  quilting too. Can't forget also some additional SITD on the crown of the bookshelf. It sounds like a lot left to do, but there is so much more behind me!  My niece has been patiently waiting a couple of years for her quilt to be finished. I'm hoping to send it to AZ with my brother his next trip out here. 

Tuesday, April 18, 2023

Sewing Room and Exciting Update

Over the weekend I had two objectives, one was a requested visit to our daughter Erica and her boyfriend Ryan's residence to keep the cats company  for a little bit while they were out of town.  


Bruce kept his distance, but did come out of the bedroom to keep an eye on me. 


Zuzu was much more vocal and accepted petting--she's amazingly soft..  She was hard to get a pic of, as she was constantly moving and vocal.  I threw some toys for her, but she was really begging to get outside--she's very sneaky and I had been warned to watch for a jailbreak.  After a half hour or so visit, I threw some treats the other direction and hurried to get out the door before Zuzu dashed back.  

Erica had suggested I make a visit to the Cotton and Chocolate quilt store while in town, and I had no objection to that! At the quilt shop, I found a sale bolt that I thought would work well to complete the backing for the bookshelf quilt.  I picked up some on-sale fat quarters and bolt ends, and also a Scrap Bag.   The last time I had been in this shop was when Erica asked me to make a quilt for her boyfriend Ryan's best friend, Gavin,  and we had bought the main fabric there for the Double the Plus pattern.  I found it an amazing coincidence Saturday, when I went up to the cutting counter, that of all the bolts of fabric in the shop, the clerk was holding the bolt of Dublin fabric we chose for Gavin's quilt!  

I got to work on the backing, for which I chose a vintage fabric I picked up in a thrift store some months ago. 


This 42" wide Hoffman fabric has 18 colors in the print. 


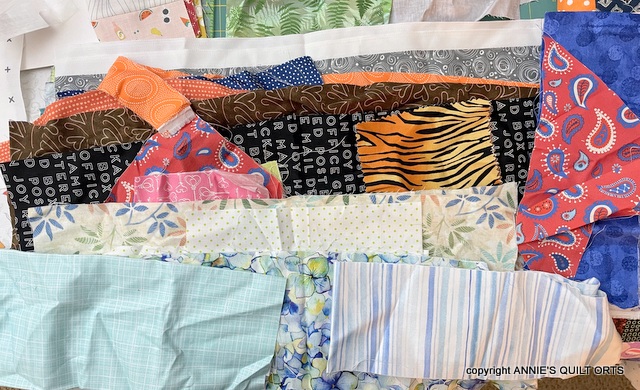
I liked the complement with the scale and background of the repro blue and white fabric I found at Cotton and Chocolate on a good bolt-end sale.  Another purchase was a scrap bag for $6.00 that held all these pieces:

That is a lot of fabric for a very low price! It was a good thing I had something to distract me while waiting for a long-anticipated event: 


A proposal and engagement!  Ryan had secretly visited us, showed the gorgeous ring, and asked for her hand.  He planned the whole thing and completely surprised Erica at the winery they were visiting.  Lots of their friends were hiding and she never knew!  She said Yes and we couldn't be happier.  Lots of wedding planning to come! 

Saturday, April 8, 2023

Sewing, Quilting, Binding

I've spent a lot of time recently sewing, quilting and binding--If only those activities worked off more calories!  
First up, a baby quilt that has been waiting for the already-made binding to be attached and finished. 


Entirely from stash, with a lot of pink fat quarters pulled from the fat quarter drawer. Many of the black and white prints were leftover from the baby quilt I made our now 7 year old grandson. 


The monkey print was also from that baby quilt.  The gray print was leftover from another quilt back as well. Using it up!  I had the measuring tape print awhile too--I thought it was fun for a baby quilt. 


The "Make the Connection" charity quilt was also finished with a white print binding, but this pic is only of the finished top.  Free pattern on American Patchwork and Quilting magazine website, by Jo Kramer. My sister and I are rejoining our local Modern guild and I will donate these two. 

While looking for something else in the Hoosier Cabinet, I pulled out the project box with the Plaidish2 blocks.  The A and B block components were all finished last Fall and I had  sewn together  just a couple of rows.  I think this got abandoned for Sewtopia prep. 


A and B block sewn together. 


As of dinnertime tonight, all these rows are together.  Two more rows to add before the center is done.  I did not cut any of the outer row C blocks yet, wanting to avoid too many repeat fabrics.  The Plaidish and Plaidish2 patterns are free on Kitchen Table Quilting. She has a lot of Freebie tutorial patterns. 

Next project to cut and sew up is a baby quilt for our next grandson, due in a couple of months.  I have a plan and fabric selected.  More on that later...

Saturday, April 1, 2023

Bookshelf Quilt Top is Done

So happy to report that the Bookshelf Quilt in progress for nearly a year is a completed TOP!  I really wanted to have it finished by March 31, but April 1 is not a bad second:)  I used the Fabric at Work Bookshelf Quilt pattern as my basic guide for my bookshelf's construction. The background fabric I was waiting for arrived  pretty quickly. 


This is Carmen, by Nancy Gere, from Windham Fabrics.  I liked the stylized print late-1800's print and thought it would make good "wallpaper" behind the bookshelf.  I started with the feet. 


My idea sketch for the feet turned out to be too small, but upon enlarging it, I ran into the hardest kind of math--QUILT MATH!  Eventually I found myself sewing a 30 degree angle and nearly had an aneurysm trying to attach the opposite foot piece and make it come out the right size and width! Finally the bottom of the bookshelf was complete. 

I was really happy with the contrast of the print to the solid brown of the bookshelf. Next was more design decision-making for the bookshelf 's top. 


I had cut WOF strips of the brown solid in two widths, just to start with.  I knew I wanted to have a crown at the top of the bookshelf so there was a lot of trial and redesign for the height and configuration. For reference, the bottom shelves are 12" tall, the top shelf is about 9", and the bottom drawers about 9" as well. 


Here I was confusing myself by trying to add a 45 degree angle to the crown, but this was entirely wrong and way too heavy looking. 


That's much better.  It was quite a struggle to get to this point!  I ended up cutting the crown pieces down and sewing two different strips of background on the ends to form the angle I wanted, without making it too heavy-looking. 


I'm certain this could have been more simplified by appliqueing the ends of the crown onto the background, but overall I think it works just fine--the print is busy enough. 


Finally, today all the border pieces were added and the top completed!  The drawers will get two knobs each at some point in the finishing process.  I have yardage with a white and black print from stash to use as backing, and the binding will be solid black. On to the next step...

Monday, March 20, 2023

Design Wall Monday--Bookshelf Quilt, More Additions and Decisions

Design Wall Monday--See more design walls on Judy's Small Quilts and Doll Quilts blog. 

I'm continuing to plug away on the bookshelf quilt for my niece, Emma.  I had assembled three shelves' worth of books, but this left the quilt top too small to be more than a wall quilt.  I already had plans to add a cornice to the top and feet to the bottom, and while looking around Pinterest, found a quilt with another feature to add, bottom drawers.  


I sketched out a plan and began pulling options from stash, finally settling on a compatible brown and black textured fabric. 

A bit of glam with a thin stripe of gold fabric a mock-up of some drawer handles were added to the design wall.  After looking at it some more, I trimmed down the depth of the drawers and then stitched the strip to the rest of the quilt.  

This daylight pic shows the color of the drawers better. The sides of the bookshelf now added, it looks more like a proper piece of furniture :)  The strips on the top are temporary--I will cut the correct size piece lengthwise from the solid brown to avoid seams. 

I then auditioned a number of fabrics for the border "wall" the bookshelf will be standing against.  Many fabrics were pulled from stash and I finally settled on a contrasting cream and black print that will look like wallpaper. It is from an antique reproduction line called Carmen, by Nancy Gere for Windham Fabrics.  Naturally I did not have enough fabric and have ordered more.  Lots more cutting and  sewing until this quilt top is finished, but I may actually meet the month-end deadline if the fabric gets here quick enough!  I am thinking of a solid black for the binding, but I will wait to cut that after the quilt center is complete.  

Thursday, March 9, 2023

March Progress

Lots of sewing room time is being spent on the bookshelf quilt for my niece, Emma, which has lingered as a UFO for over a year, regrettably!

The Kitties got moved to the top shelf--we all know kitties like high places :).  I decided to make the top shelf a couple of inches shorter than the lower shelves, for variety.  Somehow in all the reshuffling the pieces have gotten, the shelves grew very tall.  The instructions I am working with specify shelves in the 9-10" range, but mine were at least 12".  This was making it necessary to add a lot of pieces to my precut blank strips.  While I like a lot of detail, I don't want it to be cluttered. 


The left side of the bookshelf is looking very good. Another grouping of leaning books helped fill up the middle shelf.  The pieces next to it are not in final arrangement or yet sewn to the "shelf" strips.  Emma's mom, my SIL, recently visited and felt my color choices were very appropriate for her girl. That was great to know :)  I sent a pic to Emma, too, and she was very excited with the progress. I am designing more objects for the right side of the bookshelf, including her first initial.  Since I missed my February finish deadline, I am aiming for March 31 now :)

Also seeing progress is the Winter Bouquet DMC cross-stitch kit. I had finally finished all the cross-stitches...  


...and have made a start on the outlining.  There is a LOT of surface work and outlining to do, but it is coming along. I have to reference the pattern symbols and colors frequently.  Much of the outlining is with this green shade in a single strand!  It will get finished, eventually...


Monday, February 27, 2023

Design Wall Monday--Bookshelf Quilt

 Design Wall Monday--see more great design walls on Judy's Small Quilts and Doll Quilts blog. 

I gave myself a month-end deadline with the Bookshelf Quilt for my niece, Emma, that has been hogging the design wall for months. Real life interruptions will likely push back a finish, but progress is being made after a long hiatus. 


Sandwiched books between the brass trimmed bookends--and another grouping of three books are stitched together now.  Directions are from the Fabric at Work Bookshelf Quilt Pattern.  

I also made a start on another grouping.


I added the toile black and white strip to one book spine.  Lots more decisions to make, but I am having fun playing in the scrap drawers, as usual!  Next task is to make some horizontal book stacks to support some feline friends.


I did buttonhole stitch down the tails but don't have a photo of that.  These cats are about 7 inches tall and need probably both more black background at the top as well as some book spines under them. 

There are then a couple of embroidery pieces that need enlarging/framing for the bookshelves.  Good to be working on this again.

Monday, February 13, 2023

Design Wall Monday--Borders for Scrappy Squares Quilt

 Design Wall Monday--see more great projects on Judy's Small Quilts and Doll Quilts blog. 

The latest squirrel project made of scrappy 3.5" squares had made it to about 35" square, but that isn't really big enough to be a useful quilt, to me..  

In my yardage bins I found a number of strips that were border cuttoffs from the Go Four It quilt top I put together last year. 


I wasn't too happy with the joins for these borders, but overall the quilt is so large and busy, I wasn't too fussed about it. For this smaller, quilt, however, I took more care with the joining. 


One of these strips has a pattern-matched seam.  It only took three tries to get it perfect :)


Originally I thought I would do a narrow border, but this brown print looked better cut wider, 3.5", same as the block size. 


I haven't decided how many little stars/churn dash blocks I will make, perhaps not the whole length of the top. I may end up with partial borders or cornerstones in this cheddar fabric.  Not very much of this is left either, but using up stash is certainly a necessity, as storage is at MAX !

Monday, January 23, 2023

Design Wall Monday--Accidental Squirrel

Design Wall Monday--see more great projects on Judy's Small Quilts and Doll Quilts blog. 

While hubby was off golfing on Sunday, I poked around my small projects drawer and the precut squares and strip drawers for entertainment.  There were some brown/white HSTs that looked like a good starting point.  Soon I was pulling more browns and neutrals, cutting up more scraps to make HSTs. 


A pattern soon showed up, though it seemed to take all afternoon to get to this point!  Finding enough of one brown scrap/partial fat quarter to cut matching 4" squares  for the HSTs was the first hurdle.  Initially I was going to make only three blocks...


Then I made three more, and included the blue print. That led to needing another row to make a more cohesive scrappy quilt. Improv is hard!  I do better when there is some commonality; in this case, cheddar centers with the four brown squares, and creamy yellowy prints with red centers for the simple churn dash blocks.  


Lots of auditioning, trimming, refolding and reorganizing.  It was good to poke into the fat quarter dresser, but a colorful squirrel showed up, too!

While at Sewtopia Palm  Springs last November, I bought a curated fat quarter stack  at the in-event shop, in colors foreign to most of my stash.  They have been in a wire bin on top of the fat quarter dresser, so I  see them frequently.  I decided to find a fat quarter friendly pattern among my library.  Several options were narrowed down to the Livin Large pattern booklet by Heather Mulder Peterson--seems she's my favorite designer recently--having just finished the bindings on two runners from another booklet of hers :)  

The pattern I was drawn to is on the back of the booklet, Pretty in Pink, and required additional fat quarters for the throw size, meaning many auditions from the stash drawers. The curated fat quarter bundle is the top group in this photo.


Pink and blue are not colors I have much of, but I did find some sweet coral options and a repro blue print that blended. The pattern also can be cut from 10" squares. I likely will not add the applique, but we'll see!  The bolt of Kona Snow I bought last year still has plenty of fabric on it, which I will use for the narrow sashing. Nice to have all the fabric I need for this on hand!  

Thursday, December 29, 2022

Christmas Meadowland Motif Quilting

 Today's sewing room activity was dedicated to the Meadowland Christmas Quilt.  I really want this completed before it is time to clear away all the season's decor!  To that end, I concentrated on the white squares. I drew up a peppermint candy swirl on freezer paper. 

The fabric had a six section red and white candy, as you can see above, but I added another "arm" to the swirl for the large white squares.  I used a six inch plate to draw the circle and then cut apart a fairly freeform drawing of the swirls.  The swirls didn't take too long to draw into the 9 white squares in erasable pen.  Note: the designer's pattern called for smaller squares that met in the corner of the big blocks; I wanted to eliminate those lines so assembled my version differently from Meghan's pattern (Then Came June).


I stitched these in white thread but they would be cute in red or green thread too.  

The nine squares are all quilted, burying the threads is on tomorrow's agenda.  The final quilting job will be the rectangles on the sides.  I'm considering either wooden spoons or candy canes there.  Oh! and the corner squares will also need something...

Monday, December 26, 2022

Design Wall Monday--Christmas Vacation

Design Wall Monday!  See more Design Walls on Small Quilts and Doll Quilts blog. 

I hope all who celebrate the season had a lovely time with friends and family.  I got all the mug mats made for my co-workers in time to distribute at our holiday party.  

They were well received, no leftovers to take home!

The backs...As you can see, quilting was kept to a minimum, just the center square for most, but a few got some additional lines.  I am sure I'll make many more...maybe even one for myself, lol! 

Hallmark Mischievous Kitten ornaments on the tree.  The newest is the stripped tabby who knocked over the hedgehog planter.  Ridiculously cute!


The binding change on the poinsettia runner.  In the end, I just liked the striped fabric option more!  I did a narrow binding so it is not too overpowering. 

Refreshing the runner and cancelling out the old ill-made solid red binding makes me happy!

My Christmas Meadowland quilt got its plaid binding while I decided what to stitch in the plain squares and rectangles.  

There are a lot of white squares to quilt! I've decided to do peppermint swirl candy shapes in the white squares, and candy canes in the rectangles. I'll make a freezer paper templates for that job.  The quilt is 65" square, a good lap size. Meadowland pattern by Then Came June.  Off to the sewing room for my first day of vacation--I don't have to go back to work until next year :)

Design Wall Monday--Catching Up

 Design Wall Monday --See more design walls on Judy's Small Quilts and Doll Quilts blog.  I disappeared for awhile, due to computer issu...